Hello everybody, I hope you are having an amazing day today. Today, we’re going to make a distinctive dish, brazilian coconut cake 🇧🇷. It is one of my favorites. For mine, I will make it a bit tasty. This is gonna smell and look delicious.
Brazilian Coconut Cake 🇧🇷 is one of the most well liked of current trending meals on earth. It’s simple, it’s fast, it tastes yummy. It is enjoyed by millions daily. Brazilian Coconut Cake 🇧🇷 is something which I’ve loved my whole life. They’re fine and they look wonderful.
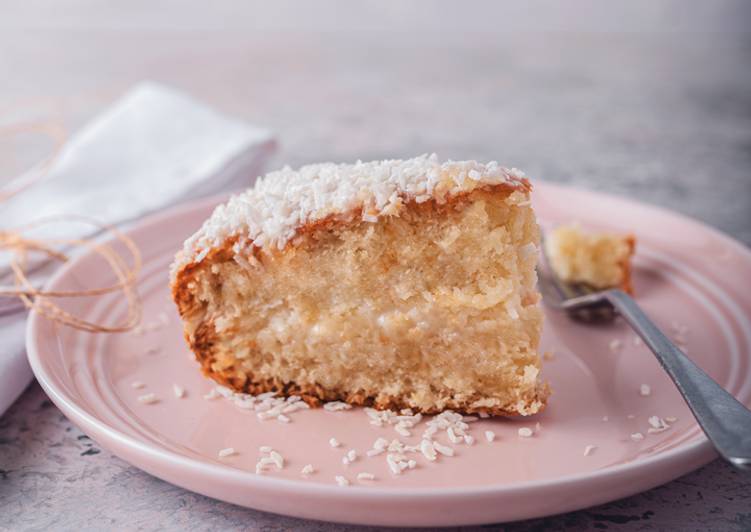
This Brazilian coconut cake is moist, easy to make, and gives you visions of swaying palm trees upon the first bite. We Brazilians simply love a good cake, from the fluffy to the moist ones. Usually, we serve cakes in the afternoon, accompanied by a freshly brewed coffee or.
To get started with this recipe, we must prepare a few components. You can cook brazilian coconut cake 🇧🇷 using 11 ingredients and 10 steps. Here is how you can achieve that.
The ingredients needed to make Brazilian Coconut Cake 🇧🇷:
- Prepare 180 g Caster sugar
- Make ready 200 ml Sunflower oil
- Make ready 3 small Eggs
- Get 270 g White flour
- Get 50 ml milk (can be substituted for oats, soya, or almond milk)
- Take 1 tbsp baking powder
- Take 50 g desiccated coconut
- Get For the sauce
- Prepare 400 ml Creamy coconut milk
- Make ready 397 g Condensed milk (1 can)
- Prepare 100 g desiccated coconut to sprinkle
This popular coconut cake is made the Brazilian way - soaked in three types of milk for a moist and luscious cake. Regular milk, condensed milk and coconut milk give it loads of flavour. Tapioca pearls are a popular Brazilian ingredient, added to puddings and cakes and most of the times paired with coconut milk/ cream and condensed milk. This perfect coconut cake sets the bar for homemade cakes everywhere.
Steps to make Brazilian Coconut Cake 🇧🇷:
- Butter a 25 cm round tin and powder it with flour. Heat oven 180c/fan - 150c/gas.
- In a bowl, mix the sugar and sunflower oil. Add the eggs and beat with a mixer until it looks lighter.
- Sieve the flour into the bowl and mix it all in low speed, with the mixer.
- Add the creamy coconut milk, the milk, and the desiccated coconut. Mix well with the mixer and then add the baking powder. Mix till there are no lumps of baking powder left.
- Pour into the tin and in the oven. Wait 30 minutes until it's cooked. To make sure it is ready, pierce the cake in the middle with a skewer. It is ready if the skewer comes out dry.
- Prepare the sauce. Mix the coconut milk and the condensed milk in a bowl. Set aside.
- Once the cake is ready, leave it to cool down so you can cut it horizontally across the middle, without breaking it.
- Spread the sauce onto the bottom. It will be quite runny but the more you put the better it is. Usually half of the sauce.
- Evenly, sprinkle desiccated coconut on. Put as much as you like!
- Put the top part back on, pierce all over the top with a fork to let the sauce in. Pour the sauce until it is all covered. Sprinkle more coconut and voila!! - If you want, you can put it back in the tin to pour the sauce. It will contain the liquid. Also if prepared the day before, keep it in the fridge, it makes it even more special.
It's supremely moist with a soft fluffy crumb and intense coconut flavor. For success, follow this recipe carefully including using cake flour, egg whites, sour cream, and canned coconut milk. At the request of many readers, let me. This Coconut Cake is one of the best cakes you'll ever make! It's light and fluffy, it's brimming with sweet coconut flavor and it's finished with a rich and creamy cream cheese frosting.
So that is going to wrap this up for this special food brazilian coconut cake 🇧🇷 recipe. Thanks so much for your time. I’m sure that you will make this at home. There is gonna be interesting food in home recipes coming up. Don’t forget to bookmark this page in your browser, and share it to your family, friends and colleague. Thanks again for reading. Go on get cooking!